Unity - (5) 물리 및 충돌, Raycast
1. 물리 및 충돌
1.1. 개요
- 가령 도형 2개가 있다고 가정을 했을 때 Collider가 있으면 충돌체로의 역할이 가능하다.
<엄연히 Collider가 달려서 충돌체로의 역할을 하는 중이다. 한마 유지로와 강화 유리라는 두 도형간의.>
- 이동하는 로직은 Transform으로 짰고 이동도 가능했다.
- 그런데 플레이를 시키고 나서 실질적으로는 겹치게 된다.
- 충돌체는 있지만 물리 엔진이 적용이 안된 상태라는 것.
- 만일 rigidbody가 있으면 충돌되어 튕겨져나간다.

<feat. 세계관 충돌>
- 위치를 전환시키고 회전을 가하는 것이지 물리적으로 힘을 가하진 않는다.
- 이젠 오브젝트에 힘을 가하거나 회전력을 더하거나 속도를 더한다는 것으로 접근이 된다.
- 게임에서는 물리 엔진 충돌을 자주 쓸 수 밖에 없다.
- 아이템을 습득하는 것조차 역시 물리 충돌 판정이다.
- 게임에서의 판정이 정확할수록 유저는 생각보다 더 불쾌하게 생각한다.
- 하지만 여담으론 네트워크가 적용된다면 정말 정확해야만 한다.
1.2. rigidbody
- 먼저 Plane 추가 및 Cube, Sphere 등을 추가한 다음 플레이를 했을 때는 아무 일도 없지만 rigidbody를 적용하면 중력이 적용됨을 볼 수 있다.
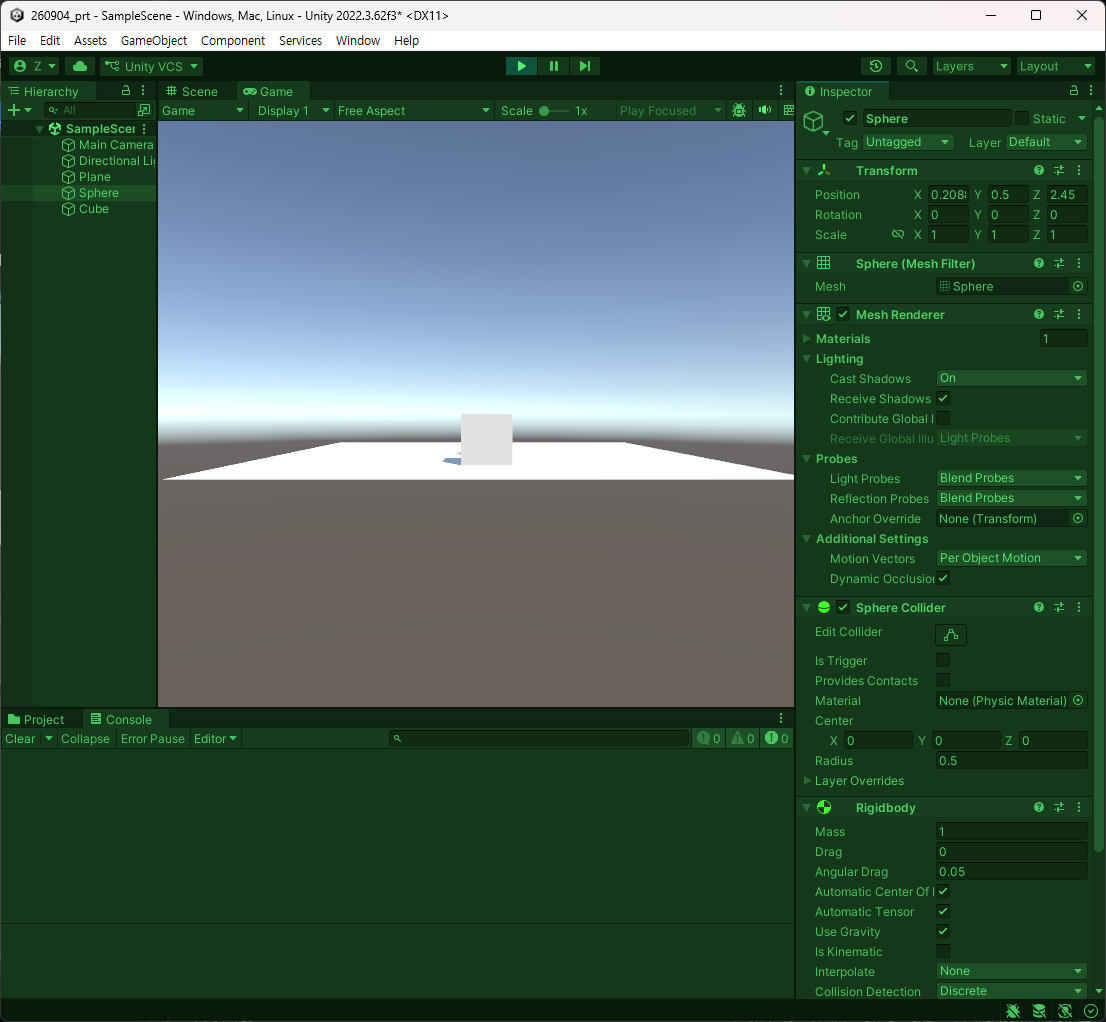
<중력으로 내려가게 된다>
- 생각보다 유니티 엔진에는 내장된 물리 기능들이 많이 존재한다(Physics).
- 그래서 가장 대표적이고 많이 쓰일 것이 rigidbody라는 컴포넌트이다.
- 질량, 중력 사용 여부, 판정을 위해 물리엔진을 쓸 경우의 kinematic,
- 물리 엔진을 통해 이동이 생기는 것을 막거나 회전하는 것을 막거나 하는 Constraints가 있다.
- 그런데 rigidbody를 줬을 때, 매우 높은 거리에서 떨어뜨렸을 경우, 물체가 통과되는 현상이 존재한다.
- 일단 중력은 rigidbody를 통해 줄 수 있다.
- 물리엔진이 적용되다 보니까 물체끼리 부딪혀 굴러가기도 한다.
- 그런데 Constraints에서 보면 회전과 움직임을 lock을 걸 수 있다.
- 물리연산 때문에 막아준다는 개념이라고 생각할 것.
- 그래서 캐릭터 이동을 구현할 때 물리적 구현에서 rigidbody에서 Constraints x, z의 회전을 잠구기도 한다.
- 최종적으로는 물체 부딪히는 것을 구현하도록 가져다 쓸 수 있다.
- Collider가 없이 할려고 할 때, 충돌의 기능이 없어 통과되는 것이 있기 때문에 Collider는 필요하다.
1.3. rigidbody에서 쓸만한 것
- C# script를 하나 만든다. 그리고 코드 상에서 진행.
csharp
using System.Collections;
using System.Collections.Generic;
using UnityEngine;

public class CubeController : MonoBehaviour
{
    private Rigidbody _rigidbody;

    private void Awake()
    {
        // 1. 컴포넌트를 가져와서 붙여준다.
        _rigidbody = GetComponent<Rigidbody>();
    }

    private void Update()
    {
        Foo();
    }

    private void Foo()
    {
        // 4. Update에서 너무 사용하지 않도록 설정.
        if(!Input.GetKeyDown(KeyCode.Space))
            return;

        // 2. 대표적으로 쓰는 것은 AddForce(), velocity를 많이 쓴다.
        // 3. AddForce()는 힘을 가하는 것이다.
        _rigidbody.AddForce(new Vector3(0,5,0), ForceMode.Impulse);

        // 5. velocity는 속도를 직접 바꾸는 것이다.
    }
}
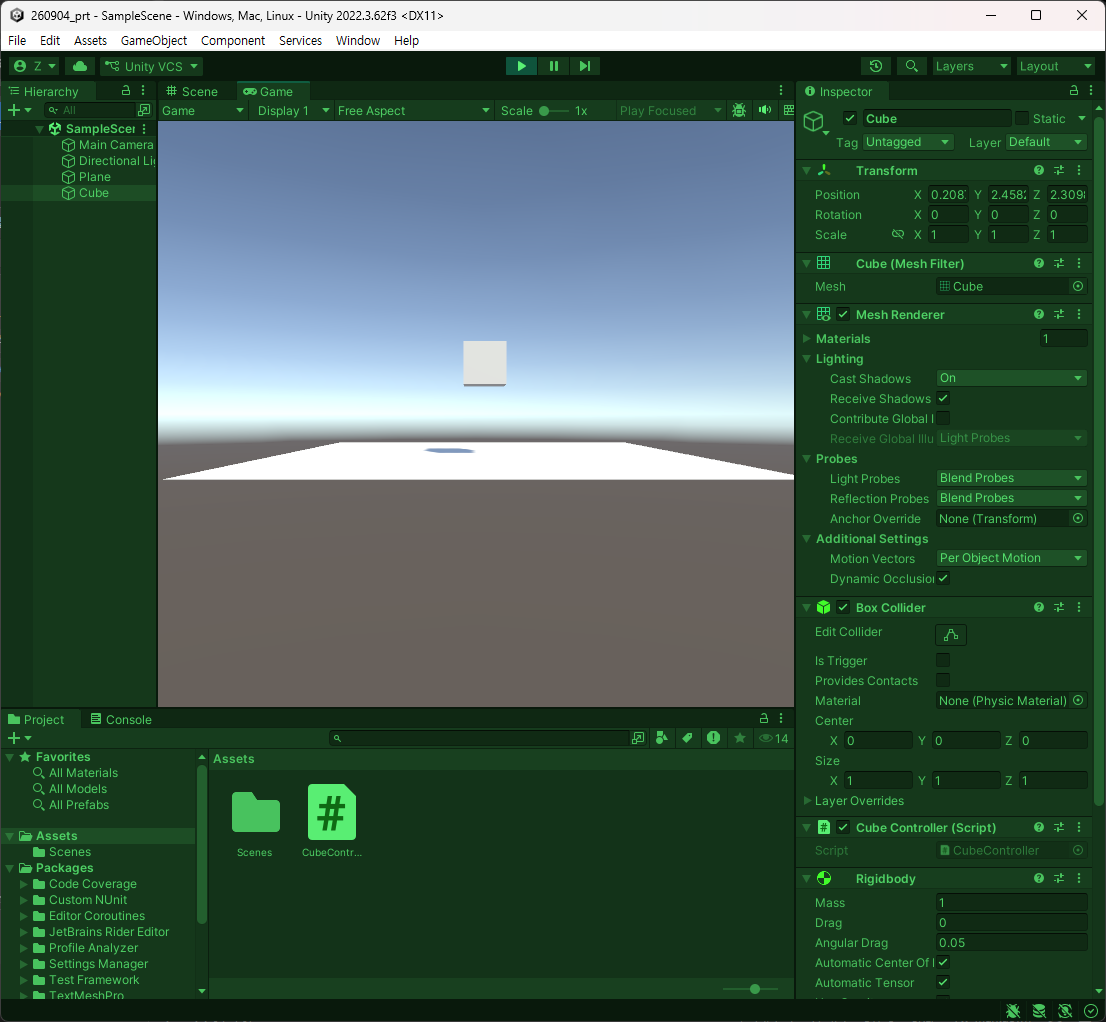
- 위와 같이 적용이 된다.
- 이번에는 velocity를 해볼 것이다.
csharp
using System.Collections;
using System.Collections.Generic;
using UnityEngine;

public class CubeController : MonoBehaviour
{
    private Rigidbody _rigidbody;

    private void Awake()
    {
        // 1. 컴포넌트를 가져와서 붙여준다.
        _rigidbody = GetComponent<Rigidbody>();
    }

    private void Update()
    {
        Foo();
    }

    private void Foo()
    {
        // 4. Update에서 너무 사용하지 않도록 설정.
        if(!Input.GetKeyDown(KeyCode.Space))
            return;

        // 2. 대표적으로 쓰는 것은 AddForce(), velocity를 많이 쓴다.
        // 3. AddForce()는 힘을 가하는 것이다.
        //_rigidbody.AddForce(new Vector3(0,5,0), ForceMode.Impulse);

        // 5. velocity는 속도를 직접 바꾸는 것이다.
        _rigidbody.velocity = new Vector3(0, 0, 5);
    }
}
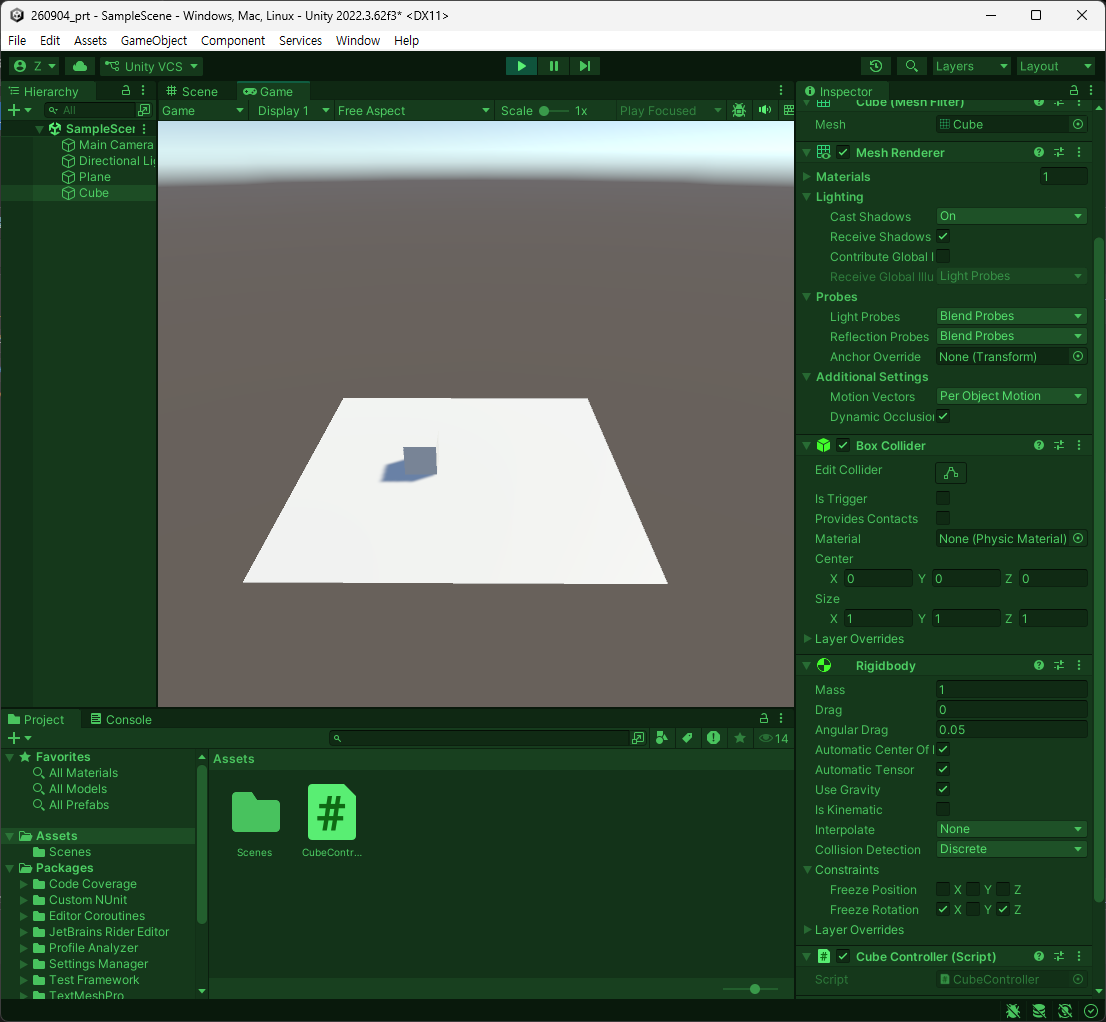
- Constraint에서 회전 x, z를 잠궜을 때 가해지고 있던 속도가 점점 줄어들고 관성이 비스무리하게 구현된다.
- 키입력과 단위 벡터를 반환받아 속도 변수를 단위 벡터에 곱해서 이동이 되는 것을 구현이 가능할 것이다.
- Transform의 경우 업데이트에서 연산을 주다 보니까 PC마다 프레임 갱신율이 다르다.
- 이동 속도의 보정을 위해 deltaTime을 썼다.
- 그런데 Transform으로 이동시킬 때와 다르게 하지만 물리엔진의 경우는 똑같은 물리 엔진의 갱신이 보장되다 보니까 여기서는 deltaTime을 곱할 필요가 없다.
- 오히려 곱하면 많이 느려진다.

<물리엔진에 deltaTime이면.. 뭔가 잘못됐어 단단히..>
- 활발하지 않지만 결과적으로는 물리의 회전력이 더해진 케이스인데 AngularVelocity로 회전시키는 것이 가능하다.
csharp
using System.Collections;
using System.Collections.Generic;
using UnityEngine;

public class CubeController : MonoBehaviour
{
    private Rigidbody _rigidbody;

    private void Awake()
    {
        // 1. 컴포넌트를 가져와서 붙여준다.
        _rigidbody = GetComponent<Rigidbody>();
    }

    private void Update()
    {
        Foo();
    }

    private void Foo()
    {
        // 4. Update에서 너무 사용하지 않도록 설정.
        if(!Input.GetKey(KeyCode.Space))
            return;

        // 2. 대표적으로 쓰는 것은 AddForce(), velocity를 많이 쓴다.
        // 3. AddForce()는 힘을 가하는 것이다.
        //_rigidbody.AddForce(new Vector3(0,5,0), ForceMode.Impulse);

        // 5. velocity는 속도를 직접 바꾸는 것이다.
        //_rigidbody.velocity = new Vector3(0, 0, 5);

        // 6. Angular Velocity를 적용
        _rigidbody.angularVelocity = new Vector3(0, 0, 5);
    }
}
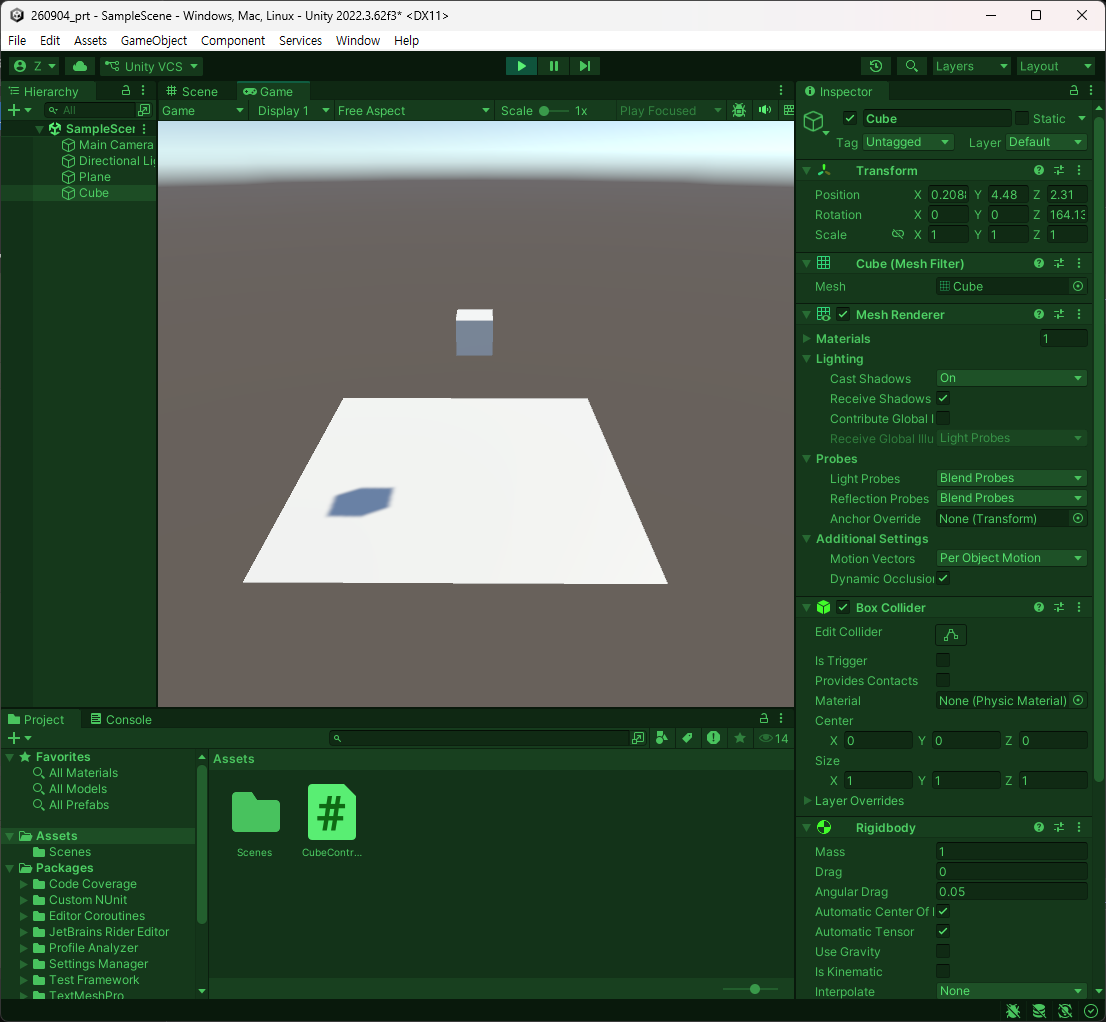
- 회전하다가 서서히 느려진다.
- 단, 캐릭터 회전은 Rotation으로 하는 것을 추천하고 이동은 키입력을 받아 단위 벡터를 반환받아 velocity로 넣어주는 방식을 취하도록 한다.
1.4. Collision
- 물리엔진을 쓰는 경우는 충돌 체크를 위함이다
- 대표적으로 Collider와 Trigger라는 키워드가 존재한다.
- Enter, Stay, Exit 이 3가지를 지원한다.
- Enter : 충돌이 시작되었을 때
- Stay : 충돌이 유지되고 있을 때
- Exit : 충돌이 종료되었을 때.
csharp
private void OnCollisionEnter(Collision collision)
{
}

private void OnTriggerEnter(Collider other)
{
}

private void OnCollisionExit(Collision collision)
{
}
- 기본적으로 제공하는 유니티 함수이다.
<유니티에서 주는 기초적인 임플란트다>
- 심지어 라이프사이클에서도 포함이 되며 Physics 영역에서 처리된다.
- 업데이트보다 한 프레임 내에서 빨리 호출된다.
- 무슨 일이 있을 때는 이벤트 함수와 실행 순서를 매번 보도록 한다.
- 이제 충돌이 시작되었을 때를 보도록 하자. Enter부터.
csharp
private void OnCollisionEnter(Collision collision)
{
    Debug.Log($"{gameObject.name} : ");
}
- 충돌 정보가 매개변수로써 담겨있을 것이며 충돌체의 rigidbody, transform, collider, gameobject도 담고 있다.
- 기본적으로 이런식으로 쓴다.
csharp
private void OnCollisionEnter(Collision collision)
{
    Debug.Log($"{gameObject.name} : {collision.gameObject.name}과 충돌!");
}
- 그래서 몬스터 GetComponent 등을 통해 데미지를 받는다거나 하는 많은 것들에 사용된다.
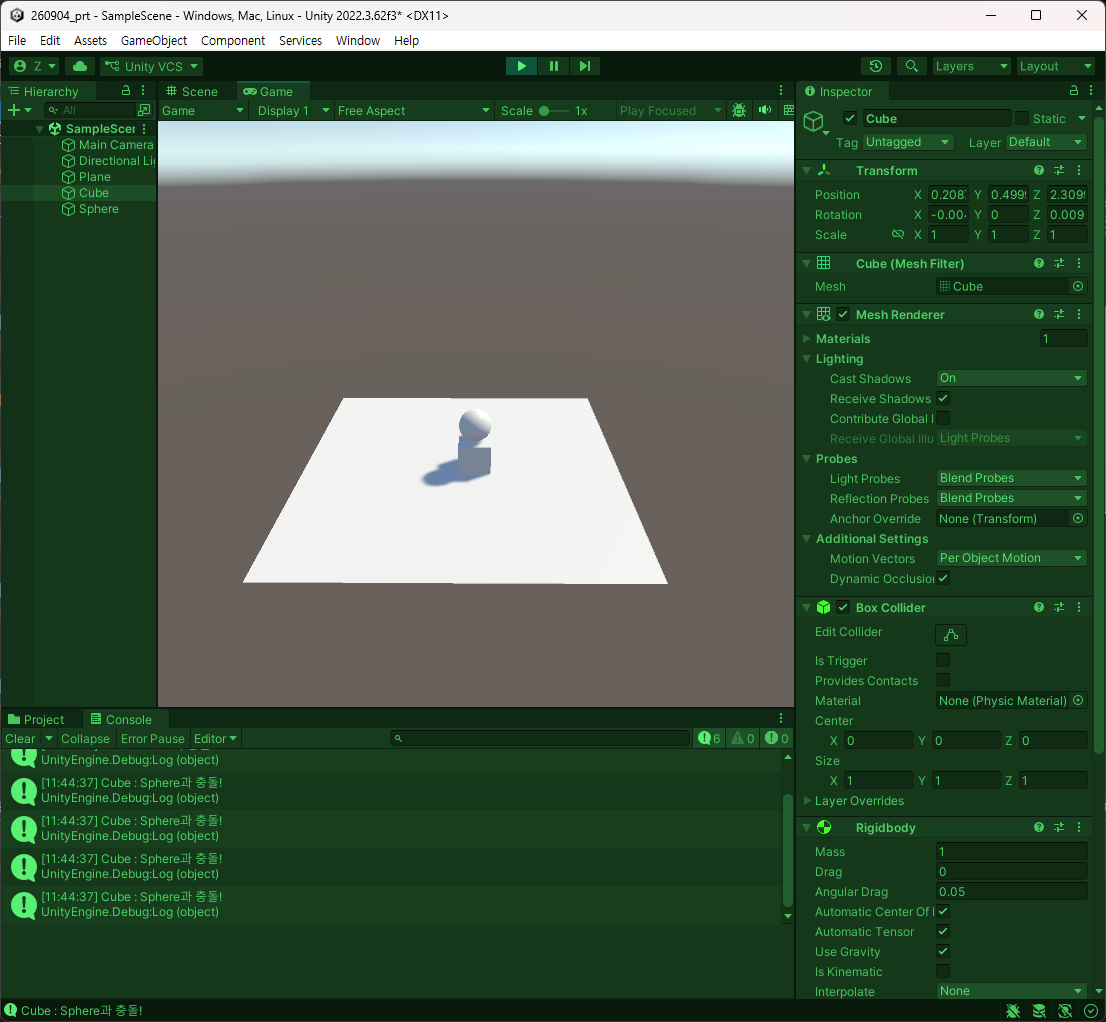
- 사용해보도록 하자. Exit을 추가.
csharp
using System.Collections;
using System.Collections.Generic;
using UnityEngine;

public class CubeController : MonoBehaviour
{
    private Rigidbody _rigidbody;

    private void Awake()
    {
        // 1. 컴포넌트를 가져와서 붙여준다.
        _rigidbody = GetComponent<Rigidbody>();
    }

    // Collision(충돌)과 Trigger(특정 이벤트 스위치)가 존재한다.
    private void OnCollisionEnter(Collision collision)
    {
        Debug.Log($"{gameObject.name} : {collision.gameObject.name}과 충돌!");
    }

    private void OnTriggerEnter(Collider other)
    {
    }

    private void OnCollisionExit(Collision collision)
    {
        Debug.Log($"{gameObject.name} : {collision.gameObject.name}과 충돌 종료!");
    }
}
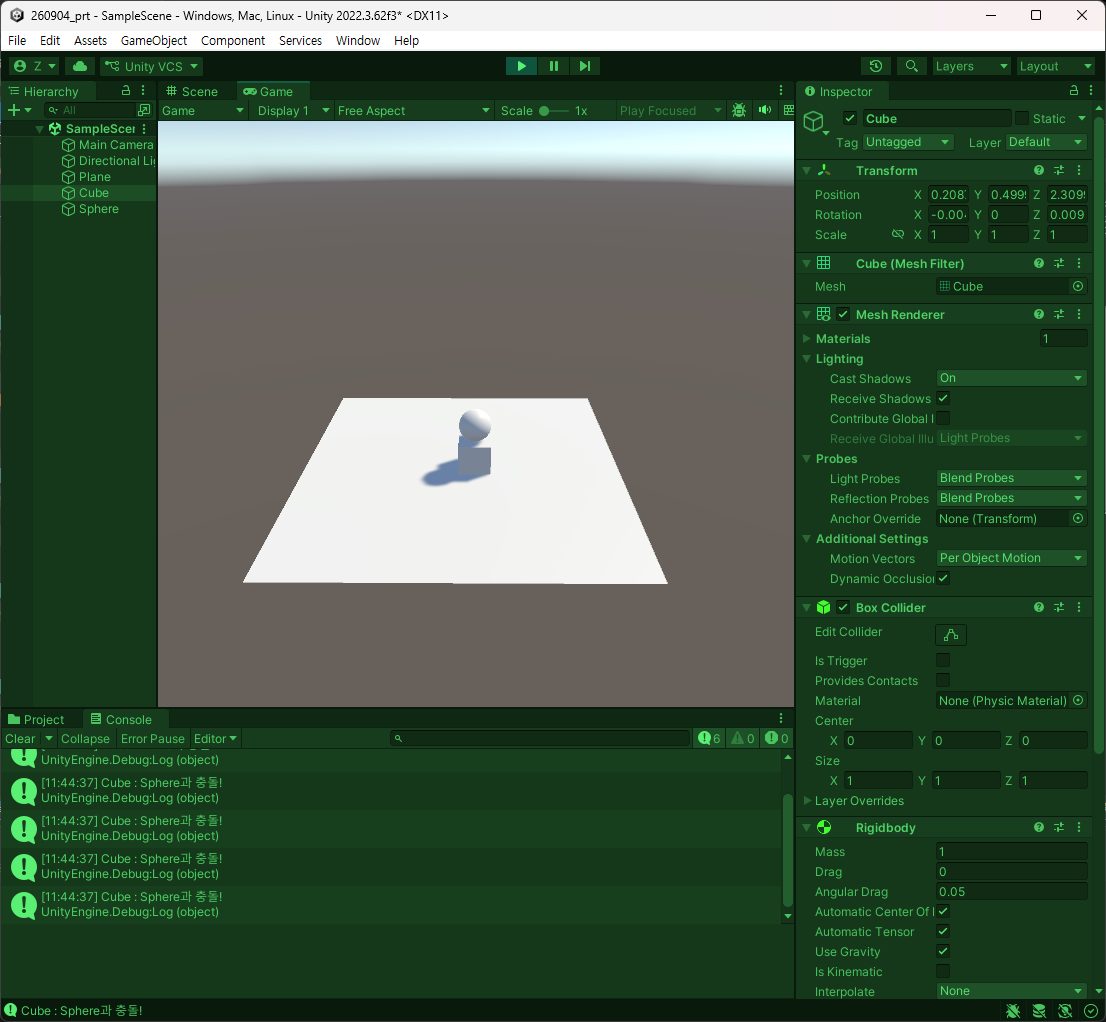
- 이렇게 충돌 정보를 담아준다.
- Stay를 마지막에 둔 것은 잘 안쓰기 때문이다.
- 충돌 정보를 전달하고 그 정보를 쉽게 얻을 수 있는 것이 저 3개의 함수이다.
1.5. Trigger
- 말 그대로의 방아쇠이다.
<내 총끝은 빛나고>
- 특정 영역에 들어왔을 때 이벤트가 발생하는 때에 사용한다.
- 일단 Sphere를 지우고 C# Script, GameObject를 추가하고 만든 오브젝트에 Sphere Collision을 추가하고 IsTrigger를 켜주면 충돌이 일어나진 않는다.
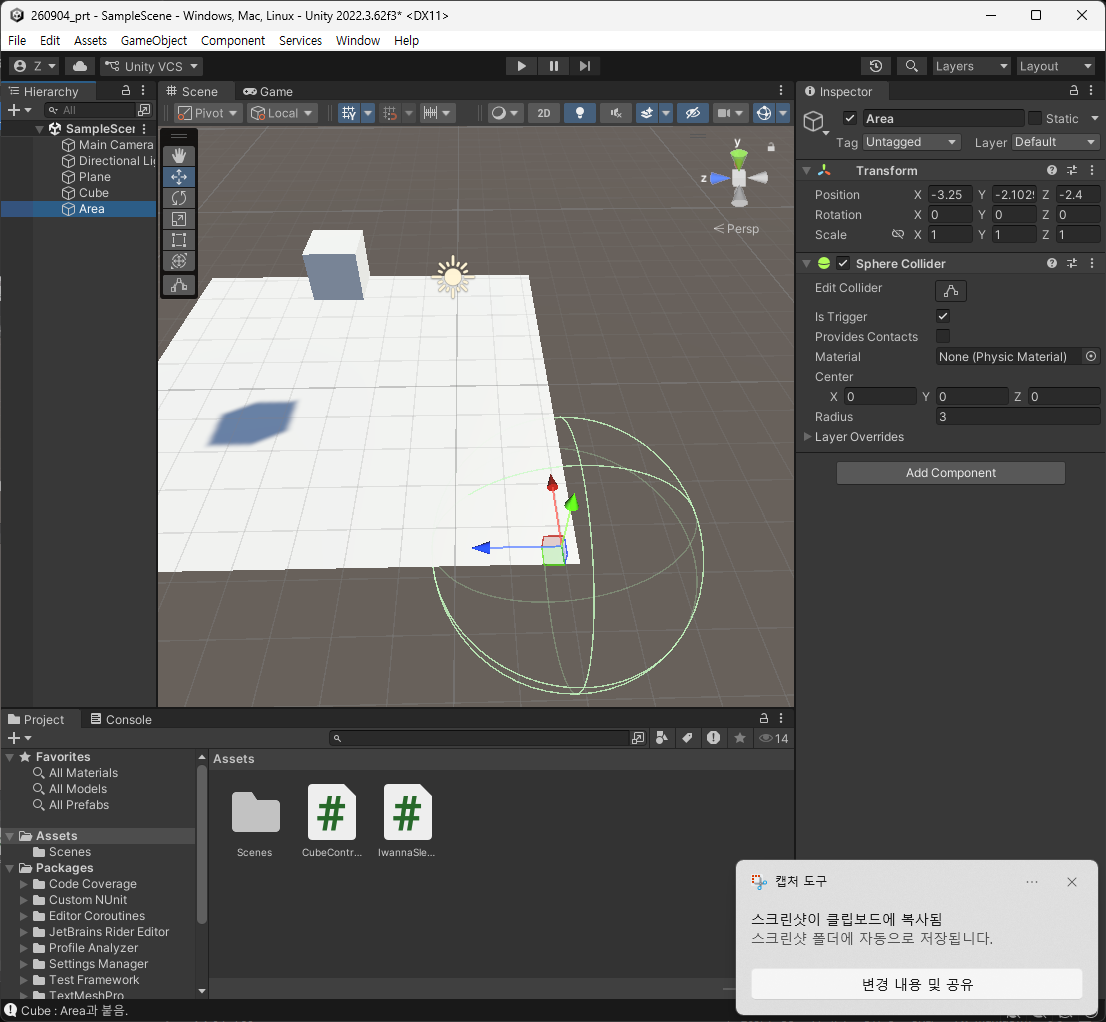
- IsTrigger는 정말 스위치이다.
<IsTrigger 딸깍>
- Trigger는 정보를 그대로 넘기는 Collision과는 다르게 충돌체를 넘겨준다.
csharp
using System.Collections;
using System.Collections.Generic;
using UnityEngine;

public class IwannaSleep : MonoBehaviour
{
    private void OnTriggerEnter(Collider other)
    {
    }

    private void OnTriggerStay(Collider other)
    {
    }

    private void OnTriggerExit(Collider other)
    {
    }
}
- 각 도형의 collider는 사실 클래스로 있는 Collider를 상속받고 있음.
- collider는 결국 component를 상속받고 있기 때문에 Transform, GetComponent, GameObject도 다 받을 수 있단 이야기.
- 이를 통해 예를 들어 플레이어가 아이템에 접근하면 먹는 처리가 가능하다는 것을 알 수 있음.
csharp
using System.Collections;
using System.Collections.Generic;
using UnityEngine;

public class IwannaSleep : MonoBehaviour
{
    private SphereCollider b;

    private void OnTriggerEnter(Collider other)
    {
        Debug.Log($"{gameObject.name} : 트리거 안에 {other.gameObject.name}과 붙음.");
    }

    private void OnTriggerStay(Collider other)
    {
        Debug.Log($"{gameObject.name} : 트리거 안에 {other.gameObject.name}과 계속 붙어 있음.");
    }

    private void OnTriggerExit(Collider other)
    {
        Debug.Log($"{gameObject.name} : 트리거 안에 {other.gameObject.name}과 떼어짐.");
    }
}
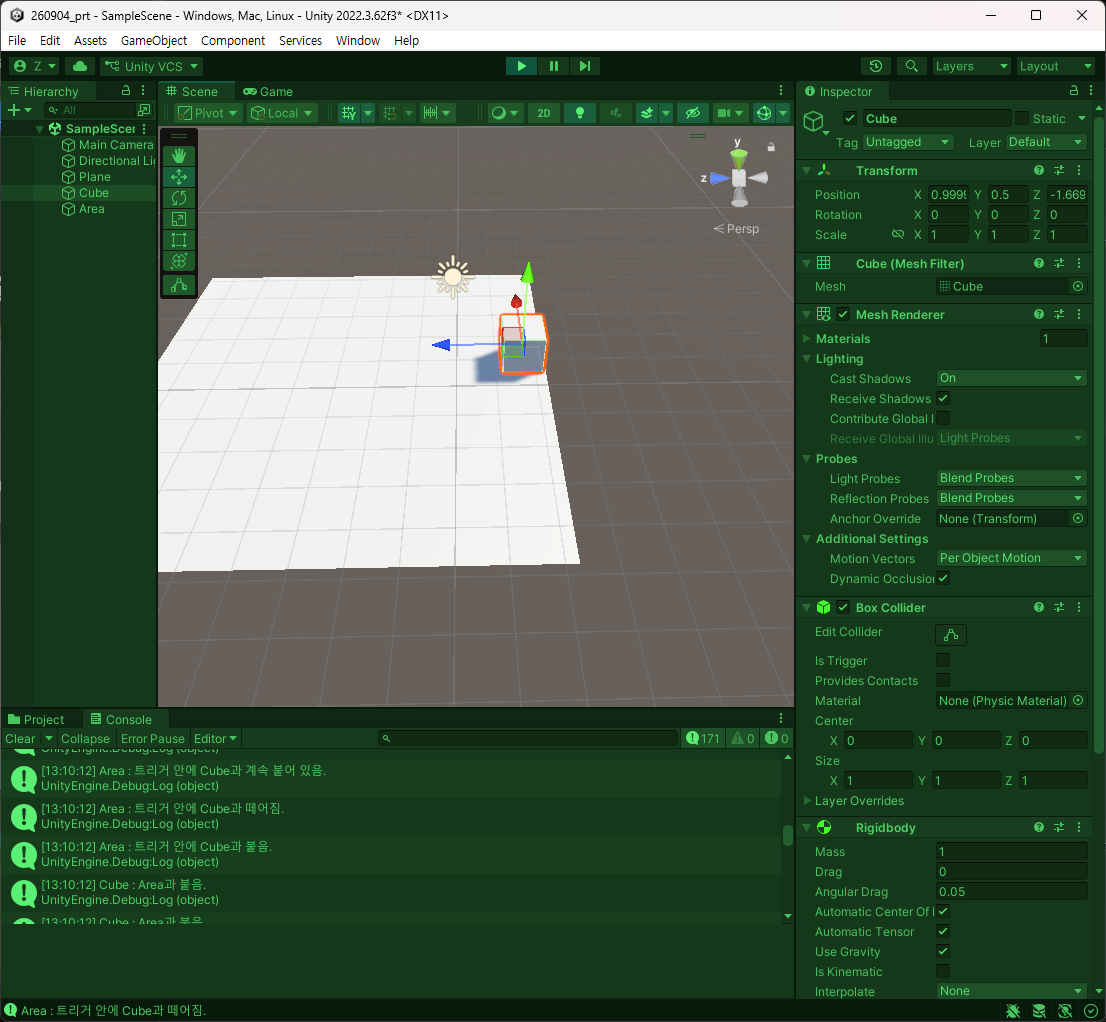
- 이렇게 Collider와 Trigger의 차이는 보내는 정보가 다르다는 의미이다.
- Trigger가 충돌을 감지한다는 것은 알겠으나 어떤 유형의 게임 오브젝트인지를 알아야 한다.
- 그렇다보니 식별할 수 있는 수단이 필요하다.
- 그래서 가급적 Layer를 쓰라고 한다. 지금은 아니지만.
- 지금은 Tag를 통해 처리를 해볼 것이다.
- Cube 쪽에 Player 테그를 달아준다.
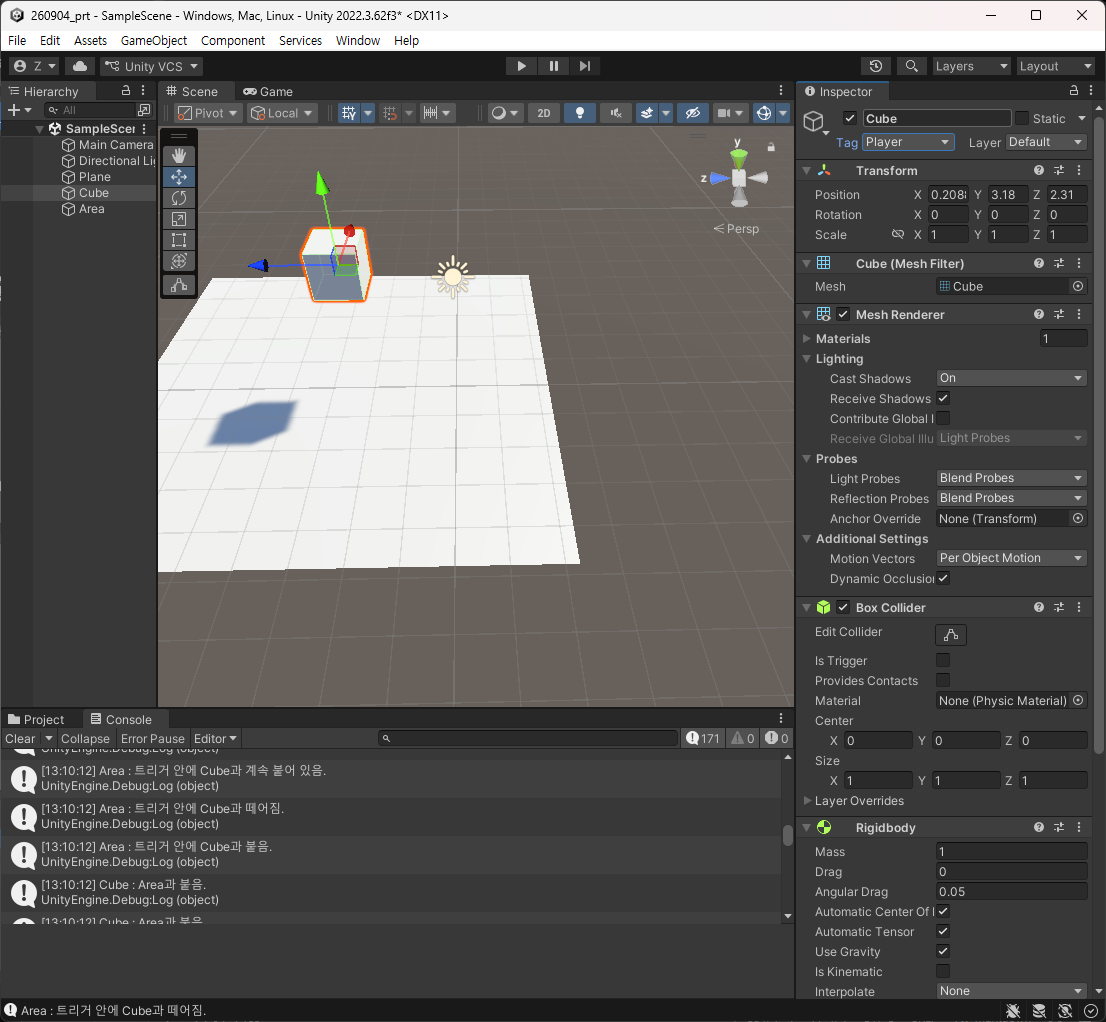
- Add Tag를 통해 Monster를 추가하여 저장.
- 임의의 도형을 추가하여 rigid 달아주고 Monster 테그를 달아준다.
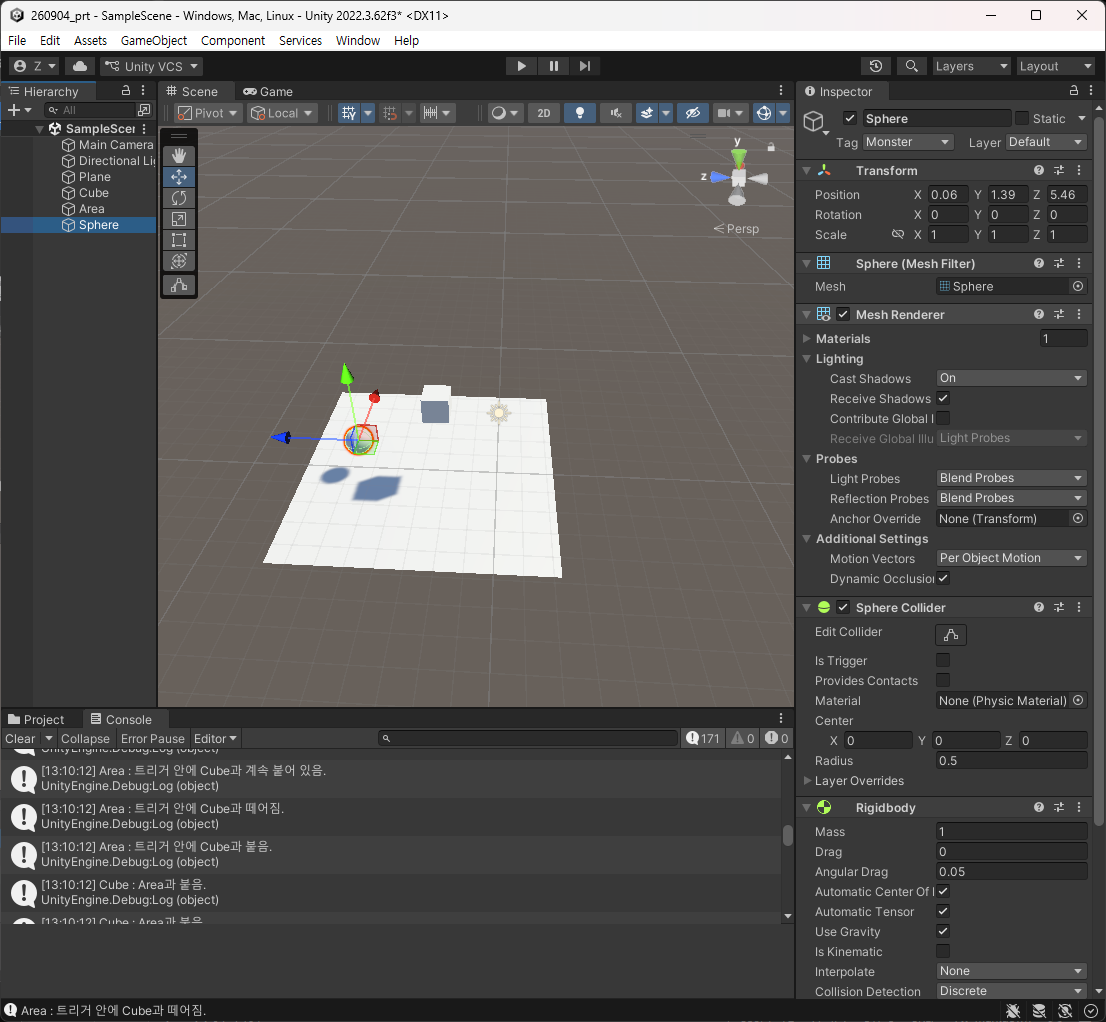
- 코드에서는 만들어둔 CubeController에 외부 함수를 두고
csharp
public void TakeDamage(float damage)
{
    Debug.Log($"{damage}만큼 데미지를 받음.");
}
csharp
using System.Collections;
using System.Collections.Generic;
using UnityEngine;

public class IwannaSleep : MonoBehaviour
{
    private SphereCollider b;

    private void OnTriggerEnter(Collider other)
    {

        Debug.Log($"{gameObject.name} : 트리거 안에 {other.gameObject.name}과 붙음.");

        if (other.gameObject.CompareTag("Player"))
        {
            //Debug.Log("플레이어가 들어옴. 문 열기.");
            CubeController c = other.gameObject.GetComponent<CubeController>();
            c.TakeDamage(10);
        }
    }

    private void OnTriggerStay(Collider other)
    {
       // Debug.Log($"{gameObject.name} : 트리거 안에 {other.gameObject.name}과 계속 붙어 있음.");
    }

    private void OnTriggerExit(Collider other)
    {
        Debug.Log($"{gameObject.name} : 트리거 안에 {other.gameObject.name}과 떼어짐.");
    }


}
- 이러면 데미지를 입을 수 있다.
- 인터페이스는 무엇을 할 수 있는 것에 따라 기능을 나눠서 정의를 했다.

<인터페이스를 가져가>
- 인터페이스 하나를 선언.
csharp
public interface IDamagable : MonoBehaviour
{
    public void TakeDamage(float damage);
}
- 이러면 CubeController를 직접 참조를 얻어오는게 아닌
csharp
using System.Collections;
using System.Collections.Generic;
using UnityEngine;

public class IwannaSleep : MonoBehaviour
{
    private SphereCollider b;

    private void OnTriggerEnter(Collider other)
    {

        Debug.Log($"{gameObject.name} : 트리거 안에 {other.gameObject.name}과 붙음.");

        //if (other.gameObject.CompareTag("Player"))
        //{
        //    //Debug.Log("플레이어가 들어옴. 문 열기.");
        //   IDamagable = other.gameObject.GetComponent<IDamagable>();
        //    c.TakeDamage(10);
        //}

        IDamagable d = other.gameObject.GetComponent<IDamagable>();

        if(d != null)
        {
            d.TakeDamage(10);
        })
    }

    private void OnTriggerStay(Collider other)
    {
       // Debug.Log($"{gameObject.name} : 트리거 안에 {other.gameObject.name}과 계속 붙어 있음.");
    }

    private void OnTriggerExit(Collider other)
    {
        Debug.Log($"{gameObject.name} : 트리거 안에 {other.gameObject.name}과 떼어짐.");
    }


}
- GetComponent가 IDamagable을 얻어올 때 null이 아닌 경우에만 적용이 되도록 할 수 있다.
- Cube쪽에도 구현
csharp
using System.Collections;
using System.Collections.Generic;
using UnityEngine;

public class CubeController : MonoBehaviour, IDamagable
{
    private Rigidbody _rigidbody;

    private void Awake()
    {
        // 1. 컴포넌트를 가져와서 붙여준다.
        _rigidbody = GetComponent<Rigidbody>();
    }

    // Collision(충돌)과 Trigger(특정 이벤트 스위치)가 존재한다.
    private void OnCollisionEnter(Collision collision)
    {
        Debug.Log($"{gameObject.name} : {collision.gameObject.name}과 충돌!");
    }

    private void OnTriggerEnter(Collider other)
    {
        Debug.Log($"{gameObject.name} : {other.gameObject.name}과 붙음.");
    }

    private void OnCollisionExit(Collision collision)
    {
        Debug.Log($"{gameObject.name} : {collision.gameObject.name}과 충돌 종료!");
    }

    public void TakeDamage(float damage)
    {
        Debug.Log($"{damage}만큼 데미지를 받음.");
    }
}
- 엔진 실행.
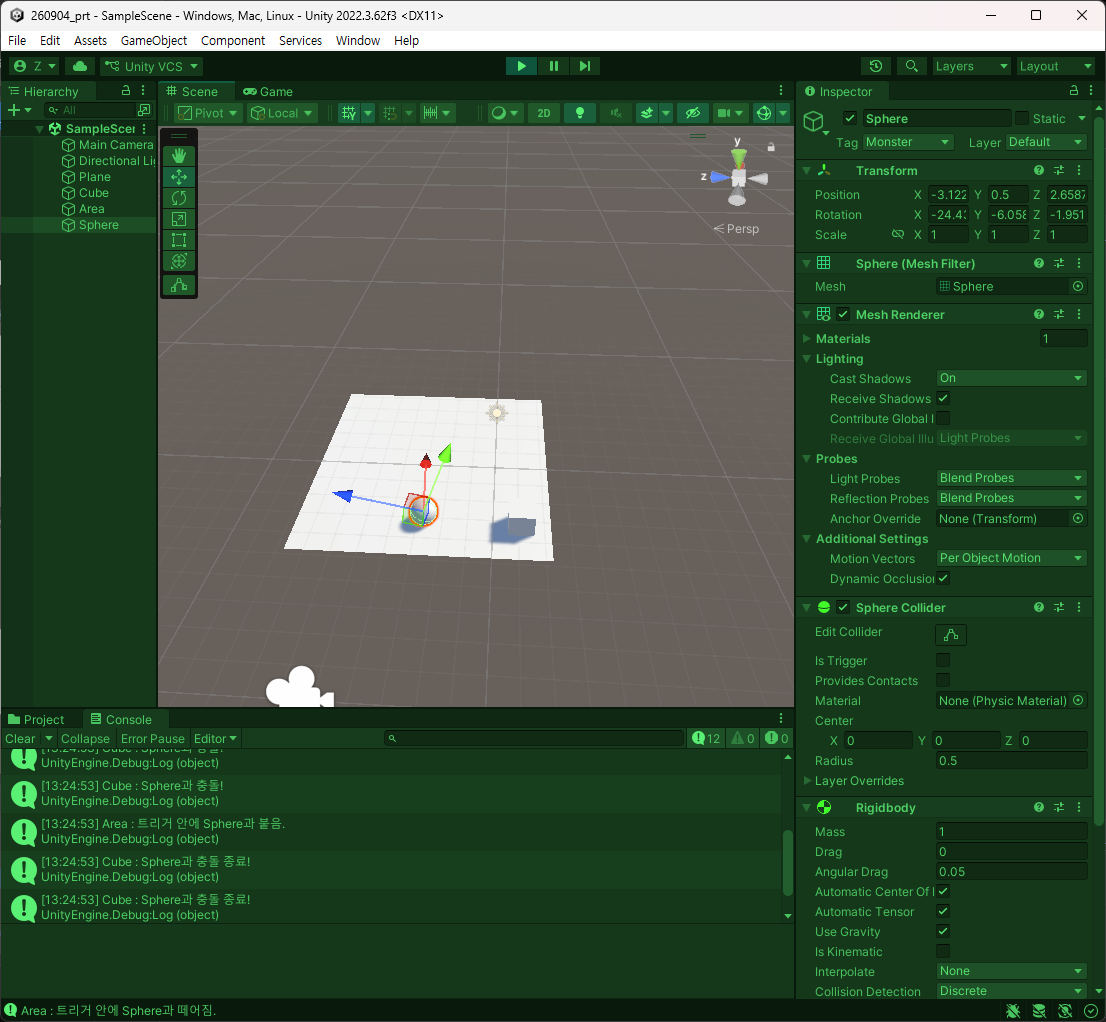
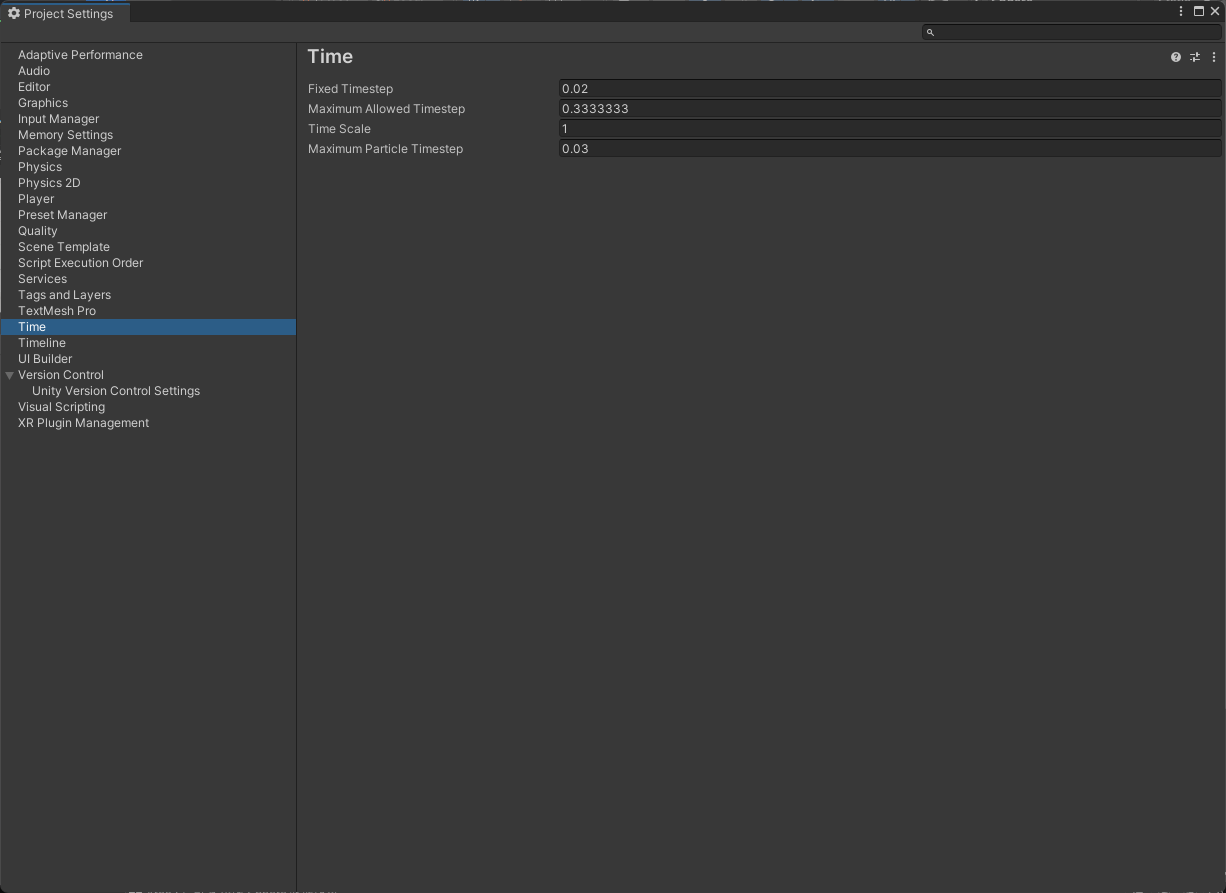
- 이 이미지는 물리연산이 이뤄지는 주기이다.
- 업데이트는 많이 있지만 FixUpdate는 유니티에서 물리 연산의 처리를 위해 불린다.
- 정해진 시간마다 호출되는 것이다.
- 물리적인 처리가 필요하면 어지간히 FixedUpdate에서 하는데 문제는 키 입력을 FixedUpdate에서 받아버리는 것이다.
- update는 키 입력을 어느 타이밍에 해도 받을 수 있지만 FixedUpdate는 수행되지 않고 스킵될 수 있는데 키 입력을 여기다가 하면 키 입력이 씹힐 수 있다.
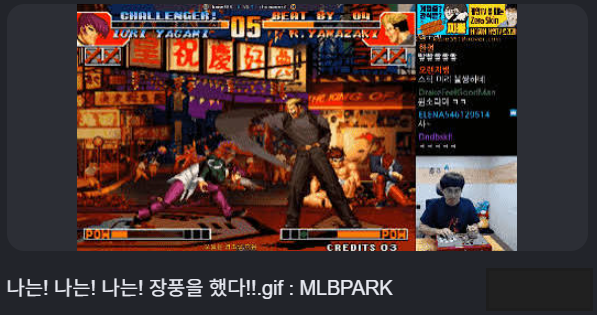
<분명 장풍 커멘드를 입력했는데..>
- 그래서 키 입력은 update에서 고정적으로 하며 물리 처리만을 FixedUpdate에서 한다.
2. Raycast
2.1. 개요
- 물리 처리를 할 때는 단순히 부딪혔나 영역 안으로의 판단이 끝이었다.
- 이것만 가지고 게임을 만드려면 조금 힘든 부분이 존재한다. 클릭 반응 구현이 그 예시.
- 그럴 때, Raycast를 쓰는데 말 그대로 특정 지점에 가상의 레이저를 발사하여 그 곳에 걸리는 충돌체(Collider)를 판단하는 방법이 있다.
- 2가지 중요한 개념은 Ray, RaycastHit이다.
- 광선과 광선에 걸리는 것을 보관하는 구조체이다.
<광선검에 닿으면 잘리듯 뭐 그런 느낌이다>
csharp
using System.Collections;
using System.Collections.Generic;
using UnityEngine;

public class CubeController : MonoBehaviour, IDamagable
{
    private void Foo()
    {
        Ray ray;
        RaycastHit hit;
    }
}
- Ray는 원점과 방향만을 가진다.
- RaycastHit은 Ray에 부딪힌 Collision에 대한 정보이다.
<RaycastHit에 Hit 된 상황이다>
- 광선에 걸린 것을 GetComponent 참조나 인터페이스를 얻거나 상호작용이 가능한 것이라면 테두리 선을 띄우고 상호작용하도록 하는 것도 가능하다.
2.2. 사용
- 사용하자. Script에서.
csharp
using System.Collections;
using System.Collections.Generic;
using UnityEngine;

public class CubeController : MonoBehaviour, IDamagable
{
    private void update()
    {
        RayShot();
    }

    private void RayShot()
    {
        // 1. 첫번째로 Ray를 만들어야 한다. 발사 시작되는 지점과 방향.
        Ray ray = new Ray(transform.position, transform.forward);
    }
}
- Ray에서 쓰는 Transform의 forward는 정면에 대한 단위 벡터이다.
- 다음, RaycastHit도 선언해준다.
csharp
using System.Collections;
using System.Collections.Generic;
using UnityEngine;

public class CubeController : MonoBehaviour, IDamagable
{
    private void update()
    {
        RayShot();
    }

    private void RayShot()
    {
        // 1. 첫번째로 Ray를 만들어야 한다. 발사 시작되는 지점과 방향.
        Ray ray = new Ray(transform.position, transform.forward);

        // 2. Ray가 충돌한 정보를 담을 수 있는 구조체.
        RaycastHit hit;
    }
}
- 뭔가 데이터를 RaycastHit에다가 넣어줘야 하는데
csharp
using System.Collections;
using System.Collections.Generic;
using UnityEngine;

public class CubeController : MonoBehaviour, IDamagable
{
    private void update()
    {
        RayShot();
    }

    private void RayShot()
    {
        // 1. 첫번째로 Ray를 만들어야 한다. 발사 시작되는 지점과 방향.
        Ray ray = new Ray(transform.position, transform.forward);

        // 2. Ray가 충돌한 정보를 담을 수 있는 구조체.
        RaycastHit hit;
        if(Physics.Raycast(ray, out hit))
        {
            Debug.Log(hit.transform.name);
        }
    }
}
- 설사 감지가 안된다고 하더라도 if문에 썼고 bool 타입의 RaycastHit이라 로직 수행은 감지가 되었을 때만 수행한다는 의미이다.
- 큐브에서 Ray를 쏠 것이기 때문에
- 라이프사이클에서 OnDrawGizmos라는 것이 있는데 프레임 그리기 바로 직전에 무언가를 해볼 수 있다. 그래서 이를 이용해
csharp
using System.Collections;
using System.Collections.Generic;
using UnityEngine;

public class CubeController : MonoBehaviour
{
    private void update()
    {
        RayShot();
    }

    private void RayShot()
    {
        // 1. 첫번째로 Ray를 만들어야 한다. 발사 시작되는 지점과 방향.
        Ray ray = new Ray(transform.position, transform.forward);

        // 2. Ray가 충돌한 정보를 담을 수 있는 구조체.
        RaycastHit hit;

        if(Physics.Raycast(ray, out hit))
        {
            Debug.Log(hit.transform.name);
        }
    }

    private void OnDrawGizmos()
    {
        Gizmos.color = Color.red;
        Gizmos.DrawRay(transform.position, transform.forward * 5);
    }
}
- 이것으로 해서 감지 범위에 들어오는 것을 가시적으로 확인이 가능하도록 해준다.
- Ray를 현재 무제한으로 쏘기 때문에 게임 안에서는 그렇게까지 판정은 하지 않는다.
- 주로 범위 내 있는가 없는가만을 판정하는 편.
- 그래서 이렇게 조정.
csharp
using System.Collections;
using System.Collections.Generic;
using UnityEngine;

public class CubeController : MonoBehaviour
{
    private void update()
    {
        RayShot();
    }

    private void RayShot()
    {
        // 1. 첫번째로 Ray를 만들어야 한다. 발사 시작되는 지점과 방향.
        Ray ray = new Ray(transform.position, transform.forward);

        // 2. Ray가 충돌한 정보를 담을 수 있는 구조체.
        RaycastHit hit;

        // 거리를 지정해서 쏠 수 있게 된다. 특정 Layer만 찾기도 가능은 함.
        if (Physics.Raycast(ray, out hit, 1f))
        {
            Debug.Log(hit.transform.name);
        }
    }

    private void OnDrawGizmos()
    {
        Gizmos.color = Color.red;
        Gizmos.DrawRay(transform.position, transform.forward);
    }
}
- 항상 그렇게 쓰이는 것은 아니지만 지면 판정 같은 것.
- 그래서 점프가 가능하다는 것이 상황마다 난해하다.
2.3. RaycastAll
- RaycastHit의 배열임.
csharp
// 거리를 지정해서 쏠 수 있게 된다. 특정 Layer만 찾기도 가능은 함.
if (Physics.RaycastAll(ray, out hit, 1f))
{
    Debug.Log(hit.transform.name);
}
- 따라서
csharp
private void RayShot()
{
    // 1. 첫번째로 Ray를 만들어야 한다. 발사 시작되는 지점과 방향.
    Ray ray = new Ray(transform.position, transform.forward);

    // 2. Ray가 충돌한 정보를 담을 수 있는 구조체.
    RaycastHit hit;

    // 거리를 지정해서 쏠 수 있게 된다. 특정 Layer만 찾기도 가능은 함.
    RaycastHit[] hits = Physics.RaycastAll(ray, 1f);
}
- 이것으로 사용해야 한다.
- 그 배열에 담아줄 것 같은데
csharp
using System.Collections;
using System.Collections.Generic;
using UnityEngine;

public class CubeController : MonoBehaviour
{
    private void Update()
    {
        RayShot();
    }

    private void RayShot()
    {
        if (!Input.GetKeyDown(KeyCode.Space))
        {
            return;
        }

        // 1. 첫번째로 Ray를 만들어야 한다. 발사 시작되는 지점과 방향.
        Ray ray = new Ray(transform.position, transform.forward);

        // 2. Ray가 충돌한 정보를 담을 수 있는 구조체.
        RaycastHit hit;

        // 거리를 지정해서 쏠 수 있게 된다. 특정 Layer만 찾기도 가능은 함.
        RaycastHit[] hits = Physics.RaycastAll(ray, 10f);

        if (hits.Length > 0)
        {
            foreach (var h in hits)
            {
                Debug.Log(h.transform.name);
            }
        }
    }

    private void OnDrawGizmos()
    {
        Gizmos.color = Color.red;
        Gizmos.DrawRay(transform.position, transform.forward * 10f);
    }
}
- 심화는 knownUnlock이 있다고 한다.
- RaycastAll은 할당하고 직관적이기 때문에 쓰고 버릴 때 임시적으로 데이터 컨테이너 역할로 구조체를 사용한다는 이야기.
- 가드를 안 쳐놓고 Ray가 클래스였으면 이렇게 사용했으면 안된다.
- 구조체는 stack 영역에서 할당되었다가 버리기 좋음.
<쓰고 버리기 좋은 구조체>
- hip에 부하를 안주고 사용할 수 있다.
- 구조체와 클래스는 이렇게 사용처가 다르게 나뉜다.
2.4. 마우스 클릭 지점 판정
- 시작점은 main camera로 하면 되는데 화면상의 좌표를 WorldSpace는 다르다.
- World 좌표계가 필요함. 방향을 알아야 하므로.
csharp
using System.Collections;
using System.Collections.Generic;
using UnityEngine;

public class CubeController : MonoBehaviour
{
    private void Update()
    {
        RayShot();
    }

    private void RayShot()
    {
        if(!Input.GetMouseButtonDown(0))
        {
            return;
        }

        // 1. Ray 시작 지점을 잡아줘야 한다.
        Ray ray = Camera.main.ScreenPointToRay(Input.mousePosition);
    }
}
- camera.main이 있는데 테그가 main camera이다.
- 접근 자체가 카메라 클래스에 접근해서 Static 멤버에 접근하면 메인 카메라에 달려있는 Camera Component를 가져와준다.
- 계속 받아올 필요 없이 변수로써 선언해버리자.
csharp
using System.Collections;
using System.Collections.Generic;
using UnityEngine;

public class CubeController : MonoBehaviour
{
    private Camera _cam;

    private void Start()
    {
        _cam = Camera.main;
    }

    private void Update()
    {
        RayShot();
    }

    private void RayShot()
    {
        if(!Input.GetMouseButtonDown(0))
        {
            return;
        }

        // 1. Ray 시작 지점을 잡아줘야 한다.
        Ray ray = _cam.ScreenPointToRay(Input.mousePosition);
    }
}
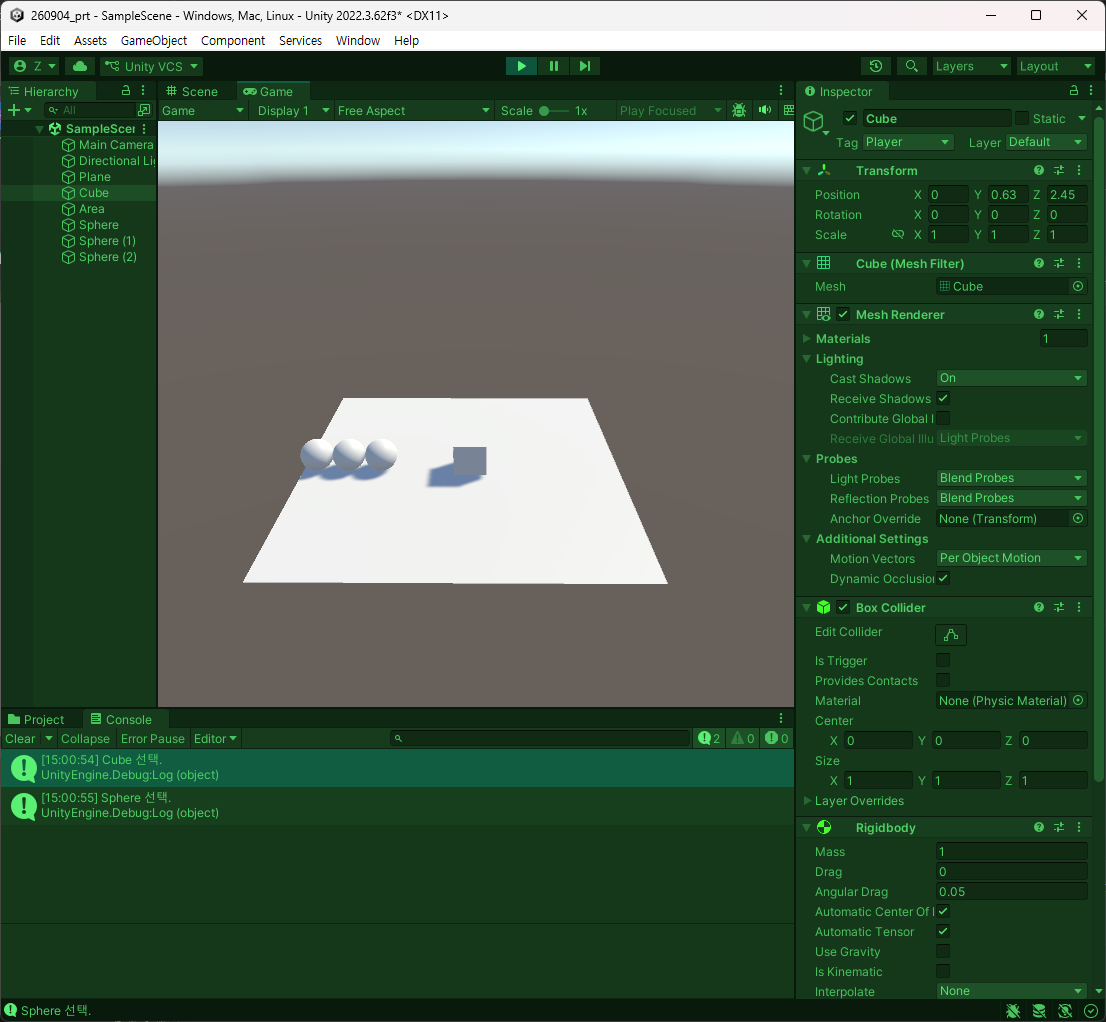
- 이번엔 Transform을 통한 이동까지 시켜볼 것임.
csharp
using System.Collections;
using System.Collections.Generic;
using UnityEngine;

public class CubeController : MonoBehaviour
{
    private Camera _cam;
    [SerializeField] private Transform _target;

    private void Start()
    {
        _cam = Camera.main;
    }

    private void Update()
    {
        RayShot();
    }

    private void RayShot()
    {
        if(!Input.GetMouseButtonDown(0))
        {
            return;
        }

        // 1. Ray 시작 지점을 잡아줘야 한다.
        Ray ray = _cam.ScreenPointToRay(Input.mousePosition);

        // 2. RaycastHit 구조체를 만들어서 충돌 정보를 담아준다.
        RaycastHit hit;
        if(Physics.Raycast(ray, out hit))
        {
            // 4. Plane은 제외.
            if (hit.transform.CompareTag("Ground"))
            {
                _target = null;
                return;
            }

            Debug.Log($"{hit.transform.name} 선택.");

            // 3. 충돌한 오브젝트의 Transform을 가져와서 _target에 할당한다.
            _target = hit.transform;
        }

        else
        {
            _target = null;
            return;
        }
    }
}
- 일단 Ground 테그를 Plane에 달아줘서 실행했을 때, Plane을 제외한 나머지는 클릭이 되는 중이다.
- 선택까지는 되었고 우클릭 이동을 구현해보도록 하자.
csharp
using System.Collections;
using System.Collections.Generic;
using System.Runtime.InteropServices;
using UnityEngine;

public class CubeController : MonoBehaviour
{
    private Camera _cam;
    [SerializeField] private Transform _target;

    private void Start()
    {
        _cam = Camera.main;
    }

    private void Update()
    {
        RayShot();
    }

    private void MoveTarget()
    {
        if (!Input.GetMouseButtonDown(1))
        {
            Ray ray = _cam.ScreenPointToRay(Input.mousePosition);
            RaycastHit hit;

            if (Physics.Raycast(ray, out hit))
            {
                if (hit.transform.CompareTag("Ground"))
                {
                    return;
                }

                // 여기서부터 호출이 되게끔 해야 할 것.
            }
        }
    }

    private void RayShot()
    {
        if(!Input.GetMouseButtonDown(0))
        {
            return;
        }

        // 1. Ray 시작 지점을 잡아줘야 한다.
        Ray ray = _cam.ScreenPointToRay(Input.mousePosition);

        // 2. RaycastHit 구조체를 만들어서 충돌 정보를 담아준다.
        RaycastHit hit;
        if(Physics.Raycast(ray, out hit))
        {
            // 4. Plane은 제외.
            if (hit.transform.CompareTag("Ground"))
            {
                _target = null;
                return;
            }

            Debug.Log($"{hit.transform.name} 선택.");

            // 3. 충돌한 오브젝트의 Transform을 가져와서 _target에 할당한다.
            _target = hit.transform;
        }

        else
        {
            _target = null;
            return;
        }
    }
}
- C# Script를 새로 만들고 새로 만들어진 것을 토대로 CubeControll을 바꾸자.
csharp
using System.Collections;
using System.Collections.Generic;
using System.Runtime.InteropServices;
using UnityEngine;

public class CubeController : MonoBehaviour
{
    private Camera _cam;
    // 1 변경
    [SerializeField] private UnitMovement _target;

    private void Start()
    {
        _cam = Camera.main;
    }

    private void Update()
    {
        RayShot();
    }

    private void MoveTarget()
    {
        if (!Input.GetMouseButtonDown(1))
        {
            Ray ray = _cam.ScreenPointToRay(Input.mousePosition);
            RaycastHit hit;

            if (Physics.Raycast(ray, out hit))
            {
                if (hit.transform.CompareTag("Ground"))
                {
                    return;
                }

                // 여기서부터 호출이 되게끔 해야 할 것.
            }
        }
    }

    private void RayShot()
    {
        if(!Input.GetMouseButtonDown(0))
        {
            return;
        }

        // 1. Ray 시작 지점을 잡아줘야 한다.
        Ray ray = _cam.ScreenPointToRay(Input.mousePosition);

        // 2. RaycastHit 구조체를 만들어서 충돌 정보를 담아준다.
        RaycastHit hit;
        if(Physics.Raycast(ray, out hit))
        {
            // 4. Plane은 제외.
            if (hit.transform.CompareTag("Ground"))
            {
                _target = null;
                return;
            }

            Debug.Log($"{hit.transform.name} 선택.");

            // 3. 충돌한 오브젝트의 Transform을 가져와서 _target에 할당한다.
            // 2 변경
            _target = hit.transform.GetComponent<UnitMovement>();
        }

        else
        {
            _target = null;
            return;
        }
    }
}
- 이제 UnitMovement에서 목적지를 받는 것을 하도록 하자.
csharp
using System.Collections;
using System.Collections.Generic;
using Unity.VisualScripting;
using UnityEngine;

public class UnitMovement : MonoBehaviour
{
    // 1. 목적지를 받기
    private Vector3 _destination;
    private bool _isMoving;

    public void SetDestination(Vector3 destination)
    {
        _destination = destination;
        _isMoving = true;
    }
    // 2. 목적지까지 이동하기
    // 3. 목적지에 도착하면 목적지 해제
}
- 그 다음, CubeController에서 호출. MoveTarget에 추가한다.
csharp
private void MoveTarget()
{
    if (!Input.GetMouseButtonDown(1))
    {
        Ray ray = _cam.ScreenPointToRay(Input.mousePosition);
        RaycastHit hit;

        if (Physics.Raycast(ray, out hit))
        {
            if (hit.transform.CompareTag("Ground"))
            {
                return;
            }

            _target.SetDestination(hit.point);
        }
    }
}
- 여기서 return에 한가지 조건 설정. 타깃이 null일 때.
csharp
private void MoveTarget()
{
    if(!Input.GetMouseButtonDown(1) && _target == null)
    {
        return;
    }

    if (!Input.GetMouseButtonDown(1))
    {
        Ray ray = _cam.ScreenPointToRay(Input.mousePosition);
        RaycastHit hit;

        if (Physics.Raycast(ray, out hit))
        {
            if (hit.transform.CompareTag("Ground"))
            {
                return;
            }

            _target.SetDestination(hit.point);
        }
    }
}
- 계속.
csharp
using System.Collections;
using System.Collections.Generic;
using Unity.VisualScripting;
using UnityEngine;

public class UnitMovement : MonoBehaviour
{
    // 1. 목적지를 받기
    private Vector3 _destination;
    private bool _isMoving;
    [SerializeField] private float _moveSpeed;

    public void SetDestination(Vector3 destination)
    {
        _destination = destination;
        _isMoving = true;
    }
    // 2. 목적지까지 이동하기
    private void Move()
    {
        if (!_isMoving)
        {
            return;
        }

        transform.position = Vector3.MoveTowards(
            transform.position,
            _destination,
            _moveSpeed * Time.deltaTime
        );

        if(Vector3.Distance(transform.position, _destination) <= 0.1f)
        {
            _isMoving = false;
        }
    }
    // 3. 목적지에 도착하면 목적지 해제
}
- CubeControll
csharp
using System.Collections;
using System.Collections.Generic;
using System.Runtime.InteropServices;
using UnityEngine;

public class CubeController : MonoBehaviour
{
    private Camera _cam;
    [SerializeField] private UnitMovement _target;

    private void Start()
    {
        _cam = Camera.main;
    }

    private void Update()
    {
        RayShot();
        MoveTarget();
    }

    private void MoveTarget()
    {
        if(!Input.GetMouseButtonDown(1) || _target == null)
        {
            return;
        }

        Ray ray = _cam.ScreenPointToRay(Input.mousePosition);
        RaycastHit hit;

        if (Physics.Raycast(ray, out hit))
        {
            if (!hit.transform.CompareTag("Ground"))
            {
                return;
            }

            _target.SetDestination(hit.point);
        }
    }

    private void RayShot()
    {
        if(!Input.GetMouseButtonDown(0))
        {
            return;
        }

        // 1. Ray 시작 지점을 잡아줘야 한다.
        Ray ray = _cam.ScreenPointToRay(Input.mousePosition);

        // 2. RaycastHit 구조체를 만들어서 충돌 정보를 담아준다.
        RaycastHit hit;
        if(Physics.Raycast(ray, out hit))
        {
            // 4. Plane은 제외.
            if (hit.transform.CompareTag("Ground"))
            {
                _target = null;
                return;
            }

            Debug.Log($"{hit.transform.name} 선택.");

            // 3. 충돌한 오브젝트의 Transform을 가져와서 _target에 할당한다.
            _target = hit.transform.GetComponent<UnitMovement>();
        }

        else
        {
            _target = null;
            return;
        }
    }
}
- MoveTarget
csharp
using System.Collections;
using System.Collections.Generic;
using Unity.VisualScripting;
using UnityEngine;

public class UnitMovement : MonoBehaviour
{
    // 1. 목적지를 받기
    private Vector3 _destination;
    private bool _isMoving;
    [SerializeField] private float _moveSpeed;

    private void Update()
    {
        Move();
    }

    public void SetDestination(Vector3 destination)
    {
        _destination = destination;
        _isMoving = true;
    }
    // 2. 목적지까지 이동하기
    private void Move()
    {
        if (!_isMoving)
        {
            return;
        }

        transform.position = Vector3.MoveTowards(
            transform.position,
            _destination,
            _moveSpeed * Time.deltaTime
        );

        if(Vector3.Distance(transform.position, _destination) <= 0.1f)
        {
            _isMoving = false;
        }
    }
    // 3. 목적지에 도착하면 목적지 해제
}
- 나머지는 인터페이스 단위로 해보도록 해볼 것.